20 minute read
ENJOY READING !
Introduction
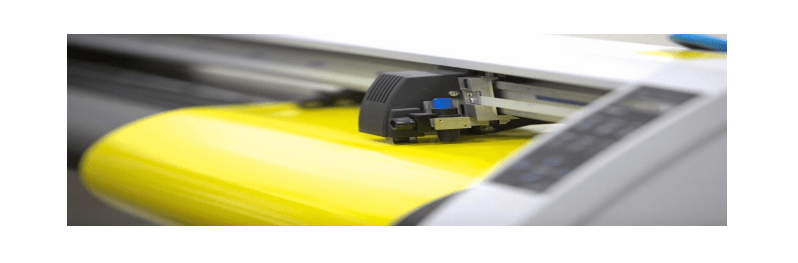
When trying to understand a vinyl cutter and how
it works, the best way to imagine it is to think of a
traditional printer. The printer receives data about
imagines from another source, usually a
computer, and then uses this to print images onto
a bit of paper.
This is like how a vinyl cutter works, only rather
than printing an image it relies on small blades to
cut the pattern of the image into the vinyl or other
material.
The first instance of a vinyl cutter was invented in
1888 when a Canadian inventor devised the
machine that could cut through fabric. This
machine was mounted onto a motor which was
then mounted on a platform which would serve as
the base for cutting.
Although bulky and difficult to operate, this
invention began the long line of cutting machines
that eventually led to the compact and efficient
variation we know today in home workshops
around the world.
Although traditionally owned and operated by
those in the sign making industry, vinyl cutters
are now more popular with those who enjoy arts
and crafts at home.
Because they are so versatile in what they can do
and allow for an aspect of creative freedom,
they’re now commonly found in home workshops
as they work well with a range of mediums and
are easy to operate.
There are different sizes and scales depending
on the type of work they’re used for, ranging from
compact desktop cutting machines to larger scale
professional grade devices used in workshops.
One of the reasons vinyl cutters have enjoyed
such huge success in both home and
professional workshops is due to the variety of
materials they can work with. Even the most
basic home desktop vinyl cutters can achieve
quite a lot, and they are an integral part in
producing many different types of arts and crafts
projects.
- Iron on transfers – with a vinyl cutter, you’re
able to design your own logos and patterns which
can be cut into iron on transfers and then placed
onto clothing. - Stickers – creating your own stickers with a vinyl
cutter means you can personalize the design and
print them as large or as small as your machine
will allow. - Signs – although commonly used for sign printing
businesses, it is possible for the home hobbyist to
cut through vinyl and other adhesives to create
signs for windows, walls, and other surfaces. - Magnets – a quality vinyl cutter will allow you to
make refrigerator magnets for your home or
business, and you can individualize each one that
you create. - Clothing and accessories – when cutting into
the fabric, you’re able to create a pattern for
sewing or making clothing and accessories like
bags and hats. - Cards and stationery – making your own
stationery is easy with a vinyl cutter and is ideal
for cutting on cardstock, paper, and other light
materials too.
In terms of professional grade vinyl cutters, these
are commonly found in any industry that uses a
sign printer. When buying a vinyl cutter for a
larger scale use like this, there may be different
specifications and features that you would deem
important.
How Does A Vinyl Cutter Work?
Although there are hundreds of different makes
and models of vinyl cutters, they all operate in the
same basic way. A vinyl cutter is made of a
computer system and a small blade, with the
computer dictating to the knife where to cut.
The material is fed into the device on the cutting
platform, and this is where the cut is performed.
Once done, the excess material is weeded or
removed, and the final image is printed. Designs
can either be programmed into the cutter or
uploaded using specialized software created for
the machine.
If you’ve never used a vinyl cutter before, there
are just a few simple steps to do so. For
beginners, it’s best to start with a simple project
such as making a sticker. Keep in mind, though,
that you should always refer to the owner’s
manual which comes with your vinyl cutter for
more accurate directions.
Find an image that you want to use as a sticker,
by either using the pre-programmed designs that
come with your vinyl cutter or creating your own.
Images can be made on several programs,
depending on what’s compatible with your
machine, and then saved as a JPEG file for
printing.
Open the software which came with your cutter
and import the image you’ve created. Make the
required changes to get it to the right size and
remove anything you don’t wish to print.
Load the vinyl you will use to cut into the
machine, being sure to insert it in line with
anything sensors that the vinyl cutter has. This is
to ensure its aligned correctly and will print the
right way. Press the rollers down onto the vinyl so
they have a firm grip on it, and check everything
is lined up by looking at the system’s display.
Once everything is ready to go, you can press the
‘cut’ button or corresponding button depending on
your machine. The cutter should move from side
to side and the vinyl will move back and forth,
indicating that it’s working. Once done, move the
vinyl carefully out of the machine and your design
will be ready to go.
Each machine will have their own set of
instructions for how to get the best use out of it,
however, most desktop vinyl cutters work this
way.
Once you get the hang of how to achieve
the best results, it will take no time at all to feed
through the vinyl and other materials and get the
perfect cut.
Important Specs And Features
If you’ve never shopped around for a vinyl cutter
before, it may be quite overwhelming when you
finally do. There are hundreds of different makes
and models available, and all with their own
unique pros and cons to the user.
- Size: There are two things to consider with the
size of your vinyl cutter to see which is right for
you. Firstly, the size of the machine itself will be
determined by how much space your home
workshop has. Secondly, the size of the cutting
area means how much material you can feed into
it. For larger jobs, you’ll want a device that can
work with around 25” or more. - Speed: The speed of a cutter determines how
fast it can cut, and this is usually measured in
millimeters per second. However, the speed of
the cut is not a determination on how precise it is,
so don’t consider this the most important feature
when shopping around. - Memory: The memory of the vinyl cutter’s
computer is responsible for storing past designs,
and sometimes holding the pre-programmed
patterns and designs that the manufacturer
uploaded. These devices can often connect with
a computer which can store the important details,
so it’s not always important. - Blade Force Or Pressure: The force and
pressure of the blade are important for
determining how precise the cut will be, and the
types of materials it works with. For home use,
the force isn’t as crucial as it would be for a
professional workshop cutter which is being used
all day and for bulk projects. - Cutting Capabilities: The capabilities of a vinyl
cutter refer to the different materials and surface
it works with. Although called a vinyl cutter, these
machines are designed to cut through things like
fabric, tint, transfer material, cardstock, and
paper. However, always refer to the manual of
your specific machine to see what it works with
best. - Optic Eye: This is a laser pointing device that
allows your machine to contour cut. Contour
cutting is ideal for use with materials such as iron
on transfers, as it allows you to cut away the
excess and just leave you with what’s needed for
your design. This can give up to 0.1mm of
accuracy which makes it the most precise cut
available. - Scanner: Not every vinyl cutter comes with a
scanner inbuilt, however, most modern ones do.
This enables you to create a drawing which is
then scanned into the machine, and then used to
cut into the material of your choice. Scanners are
measured in terms of DPI which indicates how
high the resolution will be.
Ultimately, finding the best vinyl cutter for your
home workshop will depend greatly on the type of
projects you’ll be using it for. Someone who
makes signs and stickers professionally will have
different needs to someone who creates iron on
transfers for fun, so you should have a good idea
of your own requirements before you even begin
looking around.
USES OF A VINYL CUTTER
- Labels and Stickers: You can create
physical numbers or time labels, labels for
materials, supplies, and experiments, or even
glow in the dark safety labels. - Electronics: You can create acid resist
patterns for your custom PCBs, cut thin foil
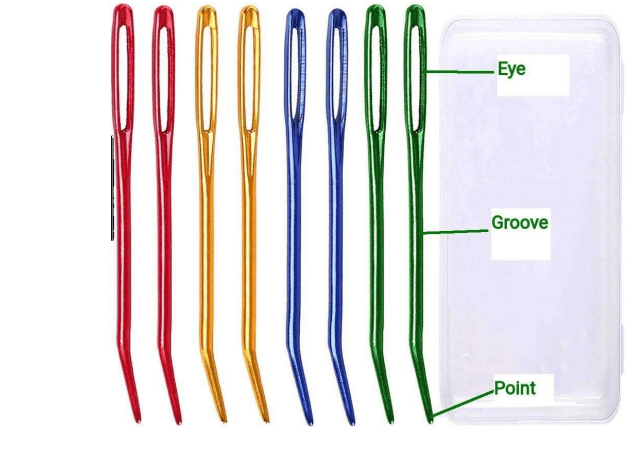
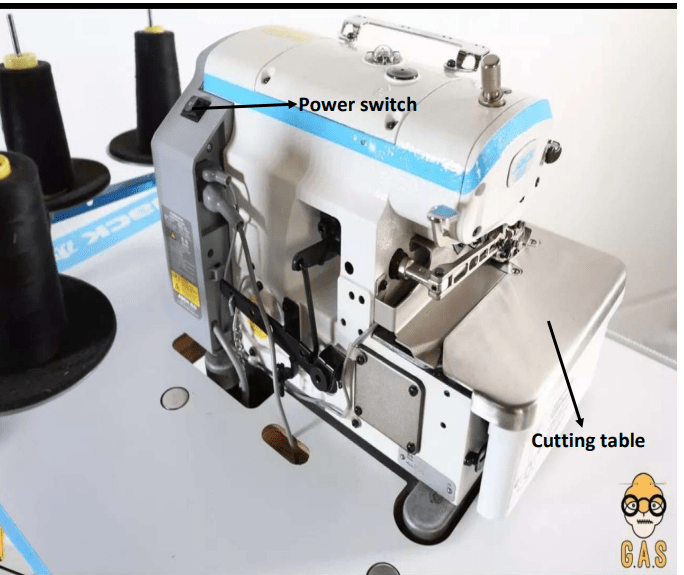
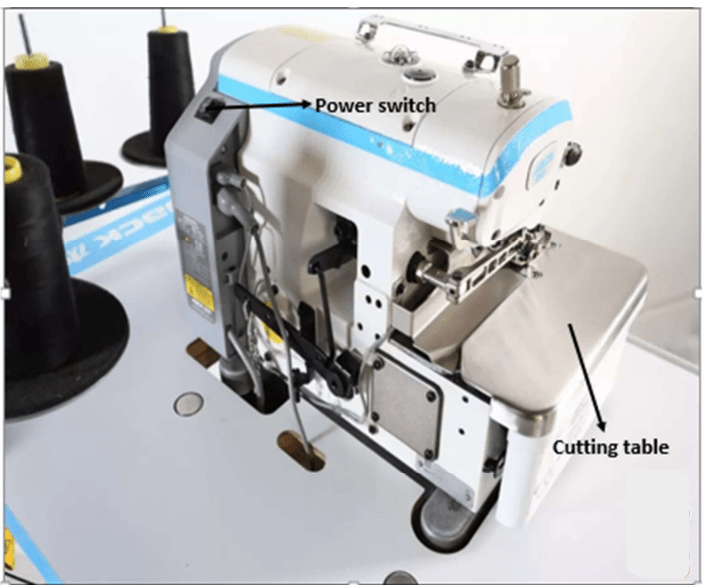
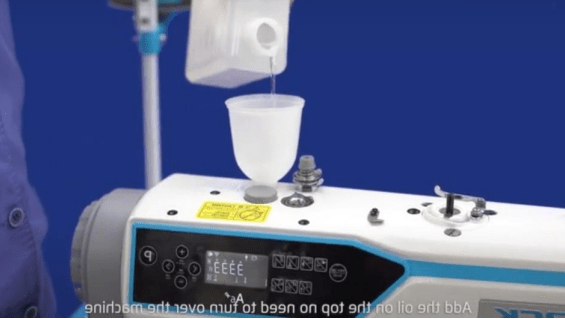
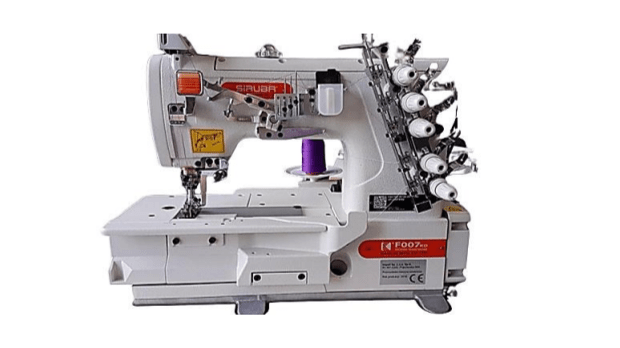
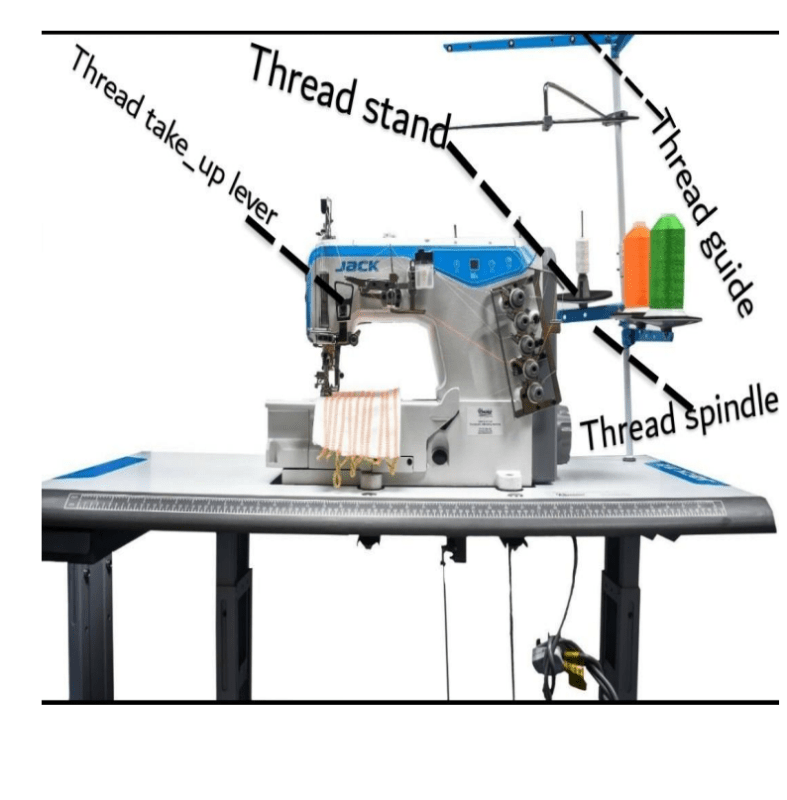
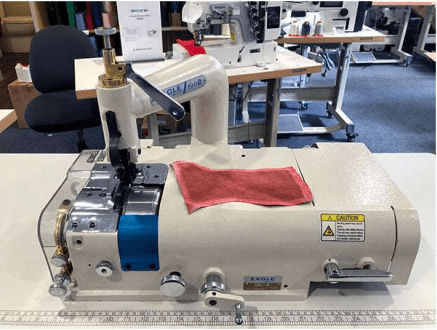
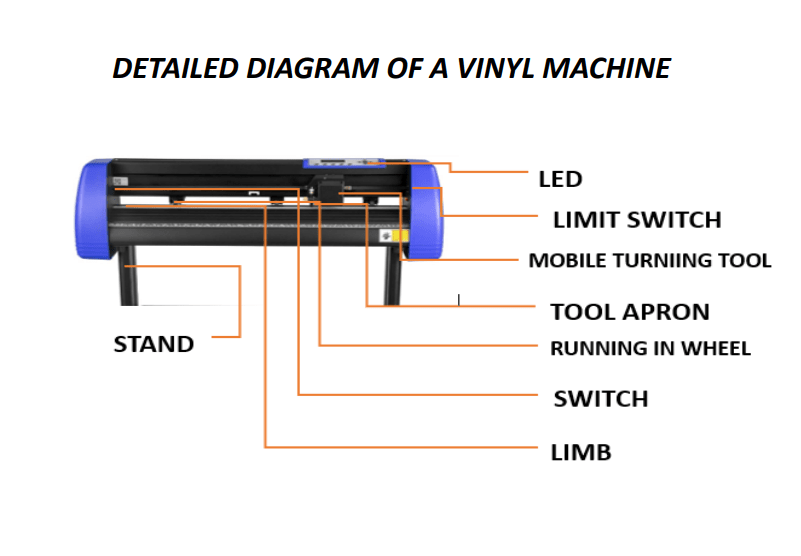
DETAILED DIAGRAM OF A VINYL MACHINE
traces, PCB layers, and RFF interference
protection for your paper circuits. - Woodworking, Craft, and Painting: You
can create and place trim markers on plywood,
MDF, acrylic, or hardwoods on-site, create edge
boundaries and resist patterns for painting,
staining, and coating, and prepare stencil vinyls
and plastic sheets suited to the specific water based or solvent-based paints you will be using. - Paper Engineering: You can cut, crease,
score, and perforate papers, cardstocks, and thin
plastics to create elaborate kirigami, origami, and
other paper craft projects. - Signs and Banners: You can create signs
and banners with a vinyl cutter. - T-shirt Designs: A vinyl cutter is a great
tool for creating custom t-shirt designs. - Wall Art: Vinyl cutters can be used to
create beautiful wall art that is both functional and
stylish. - Vinyl Mugs and Tumblers: You can use a
vinyl cutter to create designs on mugs and
tumblers.
MAINTENANCE FOR YOUR VINYL CUTTER
As a powerful machine that you’ve invested
money and time purchasing, you want to be sure
you’re caring for your vinyl cutter the best you
can.
Although most of them are covered by a
generous warranty, there are some things you
can do to ensure you get the most life out of them
and that they stay operating to the best of their
ability.
- Skipping Cuts & Perforated Lines: If you
notice errors in your cutting lines or if it seems
like the blade is skipping along your HTV leaving
your cut lines looking perforated, it might be time
to replace your cutter protection strip1 - Check the Cutter Protection Strip: The
strip, located across the length of the machine
where the blade cuts, protects the blade and
allows for a smooth pivot when cutting1
. Regularly
check this strip for any gashes, gaps, or divots. - Shallow or Deep Cuts: If you’re cutting
through the vinyl carrier even with proper force, or
if you see faint or missing cut lines completely,
make sure you have the blade depth set to a
specific standard. The blade should never extend
more than the width of a credit card below the
blade holder. - Consistent Blade Depth: Keeping the blade
depth consistent is important to protect your
blade and ensure complete cuts. - Rounded Corners: If you’re seeing rounded
cut corners rather than sharp, crisp edges, it
might be time to adjust the offset. The offset is
how the machine balances itself depending on
what blade you are using. - Preventive Measures: Keeping dirt off the
Vinyl Flooring is easier and less expensive than
removing it. - Regular Vacuuming: This is the most
important part of a successful maintenance
program. - Spill and Spot Cleaning: Spots are
inevitable, but they don’t have to be permanent.
Remove a spill quickly and there is less chance it
will become a stain. - Periodic Cleaning: Scheduled periodic
cleaning helps the Vinyl Flooring retain
appearance and improves performance. - Deep Cleaning: Seasonality can influence
the amount of cleaning required. Deep cleaning
will remove heavy soiling from within the emboss
structure and/or joints of the Vinyl Flooring. - Use of Rotary Flooring Machines: If using a
scrubbing machine, use only a slow speed (175
RPM) machine. Do not dry buff vinyl floors
without the use of a suitable finish coat.
SAFETY PRECAUTIONS TO BE TAKEN WHEN
USING A VINYL CUTTER
- Handle with Care: The device requires
installation and operation of this device requires
use of sharp blades. Caution should be taken to
make sure that fingers do not get caught in
moving gears during operation. - Power Management: Disconnect power
during assembly, service, and maintenance. - Avoid Static Build-up: Vinyl cutters are
subject to static build-up. Use of anti-static
devices including mats and anti-static vinyl
systems may be required in some environments. - Supervise Children: This vinyl cutter is not a
toy and should not be used by children without
supervision. - Avoid Magnetic Objects: Do not place any
magnetic objects in the vicinity of the cutting
head. - Manage Cables: Cables (mains power and
USB) could be a trip hazard for the operator or
those walking past the machine. - Avoid Injury: Never reach into the unit in the
vicinity of the blade holder during the cutting
operation. Discontinue any printing jobs in
progress before readjusting the blade holder. - Proper Storage: Always place the unit on a
stable base to prevent it from falling down. - Weather Conditions: Do not operate the unit
during thunderstorms; it can be damaged or
destroyed by lightning. - First Aid Kit: Ensure that a first aid kit is
available for minor cutting injuries. - Stable Workpiece: Ensure the item/object
being cut is stable to minimize the chances of
slipping.
MULTIPLE CHOICE QUESTIONS
PART A:
CHOOSE THE CORRECT ANSWER
FROM THE OPTIONS.
- What is a vinyl cutter similar to in its
operation?
A) A sewing mach
B) A traditional printer
C) A typewriter
D) A photocopier - What does a vinyl cutter use to cut
patterns into materials?
A) Lasers
B) Heat
C) Small blades
D) Ink - When was the first instance of a vinyl
cutter invented?
A) 1888
B) 1901
C) 1923
D) 1955 - Who traditionally owned and operated
vinyl cutters?
A) Artists
B) Sign makers
C) Tailors
D) Carpenters - What is one reason vinyl cutters are
popular in home workshops?
A) They are inexpensive
B) They work well with a range of mediums
21
C) They are easy to clean
D) They require little maintenance - What can a basic home desktop vinyl
cutter achieve?
A) Iron on transfers
B) Stickers
C) Signs
D) All of the above - What is a vinyl cutter made of?
A) A computer system and a small blade
B) A large blade and a motor
C) A scanner and a printer
D) A laser and a cutting platform - What happens after the material is cut in
a vinyl cutter?
A) The excess material is weeded
B) The material is heated
C) The material is laminated
D) The material is scanned - What is one thing to consider when
shopping for a vinyl cutter?
A) The color of the machine
B) The size of the machine
C) The weight of the machine
D) The brand of the machine - What determines how fast a cutter can
cut?
A) The size of the machine
B) The speed of the cutter
C) The type of material being cut
D) The sharpness of the blade - What is the memory of the vinyl cutter’s
computer responsible for?
A) Storing past designs
B) Controlling the speed of the cutter
C) Determining the size of the cut
D) Powering the machine - What are the cutting capabilities of a
vinyl cutter?
A) Cutting through fabric
B) Cutting through metal and wood
C) Cutting through glass and ceramic
D) Cutting through leather and rubber - What is an optic eye in a vinyl cutter?
A) A device that measures the material’s
size
B) A device that controls cutter’s speed
C) A device that allows for contour cutting
D) A device that scans the material - What does a scanner in a vinyl cutter
do?
A) It scans the material after cutting
B) It scans a drawing
C) It scans the blade
D) It scans the machine for malfunctions. - What is one project a beginner can start
with when using a vinyl cutter?
A) Making a sticker
B) Creating a sign
25
C) Designing a logo
D) Cutting fabric for clothing - What is one way to find an image to use
as a sticker with a vinyl cutter?
A) Using the pre-programmed designs
B) Drawing the image by hand
C) Taking a photograph
D) Downloading an image from the internet - What should you do before pressing the
‘cut’ button on your vinyl cutter?
A) Check everything is lined up.
B) Clean the machine.
C) Replace the blade.
D) Turn off the machine. - What is one thing you should always
refer to when using a vinyl cutter?
A) The owner’s manual
B) The warranty card
C) The user reviews
D) The product brochure - What is one feature that may be
important when buying a vinyl cutter for
larger scale use?
A) The color of the machine
B) The brand of the machine
C) Different specifications and features
D) The weight of the machine - What does the size of the cutting area in
a vinyl cutter mean?
A) How much space the machine takes up
B) How much material you can feed into it
C) How large the machine is
D) How heavy the machine is.
PART B:
FILL THE GAP WITH THE
APPROPRIATE ANSWER.
- A vinyl cutter can be used to create
physical numbers or time labels, labels for
materials, supplies, and experiments, or
even ___________. - In electronics, a vinyl cutter can create
acid resist patterns for your custom
____________, cut thin foil traces, PCB layers,
and RFF interference protection for your
paper circuits. - A vinyl cutter can create and place trim
markers on ___________, MDF, acrylic, or
hardwoods on-site. - With a vinyl cutter, you can cut, crease,
score, and perforate papers, cardstocks,
and thin plastics to create elaborate
_____________, origami, and other paper craft
projects. - A vinyl cutter is a great tool for creating
custom ______________designs. - Vinyl cutters can be used to create
beautiful ______________ that is both functional and
stylish. - You can use a vinyl cutter to create
designs on mugs and ___________. - If you notice errors in your cutting lines
or if it seems like the blade is skipping along
your HTV leaving your cut lines looking
perforated, it might be time to replace your
______________. - The blade should never extend more
than the width of a __________below the blade
holder. - If you’re seeing rounded cut corners
rather than sharp, crisp edges, it might be
time to adjust the ____________. - Keeping dirt off the Vinyl Flooring is
easier and less expensive than ___________. - Spots are inevitable, but they don’t have
to be permanent. Remove a spill quickly
and there is less chance it will become a
______________. - Deep cleaning will remove heavy soiling
from within the emboss structure and/or
joints of the ______________. - If using a scrubbing machine, use only a
slow speed (_____________ RPM) machine. - The device requires installation and
operation of this device requires use of
_____________. - Vinyl cutters are subject to static buildup. Use of anti-static devices including mats
and anti-static vinyl systems may be
required in some ______________. - Do not place any ___________objects in the
vicinity of the cutting head. - Cables (mains power and USB) could
be a ___________hazard for the operator or
those walking past the machine. - Always place the unit on a stable
_____________to prevent it from falling down. - Ensure that a first aid kit is available for
minor ____________injuries.
MENTION THREE SAFETY
PRECAUTIONS TO BE TAKEN WHEN
USING A VINYL CUTTER MACHINE.
41. —————————————————————
42. —————————————————————
43. —————————————————————
PART C:
FIND THE MISSING PARTS IN THE
DIAGRAM
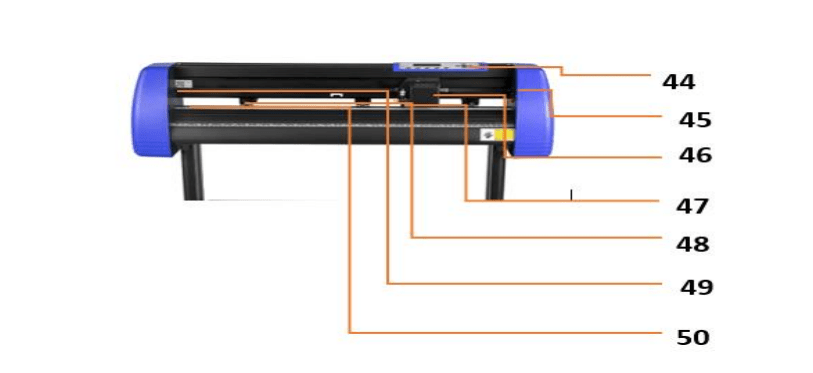
44. ——————————————————-
45. ——————————————————–
46. ——————————————————–
47. ———————————————————
48. ———————————————————
49. ———————————————————
50. ———————————————————-
INSTRUCTORS COPY
ANSWERS TO PART B
- GLOW IN THE DARK SAFETY LABELS
- PCBS
- PLYWOOD
- KIRIGAMI
- T-SHIRT
- WALL ART
- TUMBLERS
- CUTTER PROTECTION STRIP
- CREDIT CARD
- OFFSET
- REMOVING IT.
- STAIN.
- VINYL FLOORING
- 175
- SHARP BLADES
- ENVIRONMENTS
- MAGNETIC
- TRIP
- BASE
- CUTTING.
- HANDLE WITH CARE
- POWER MANAGEMENT .
- AVOID STATIC BUILD-UP
ANSWER TO PART C
- LED
- LIMIT SWITCH
- MOBILE TURNING TOOL
- TOOL APRON
- RUNNING IN WHEEL
- SWITCH
- LIMB.